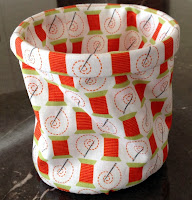
I'm always looking for quick small gifts to add to swap parcels.
This little portable thread/scrap bin was inspired by the Thread Catcher tutorial on Red Hen Fabric's quick projects page. That tutorial uses a 4" wooden inner from an embroidery hoop.
I wanted to be able to machine finish most of the project - there is still hand sewing...but nothing like the stand out dodgy running stitches I did to keep the hoop in place.
This tutorial makes a casing where you can push in a stiffening piece instead of the wooden hoop. I used rigilene for this tutorial and in one prototype, I used the plastic strapping that comes off packages!
SUPPLIES:
- Fat quarter of fabric
- Cardboard
- Scrap of batting
- Rigilene (or plastic strapping) - 1/2" or 12mm wide
- Matching thread
- 4" diameter circle template/saucer/bowl/compass...or whatever you have handy
- General sewing supplies
CUTTING INSTRUCTIONS:
From the
CARDBOARD cut 2 x 4" circles.
FABRIC: One rectangle of fabric 11" x 14"
Trace two circles onto fabric then cut out 1" bigger all around.
BATTING: Cut one piece of batting the exact size of the cardboard.
RIGILENE: Cut one strip of rigilene 15 ½" long.
The finished size is approximately 4 1/2" high and 4" in diameter.
METHOD:
On one 11" edge of the fabric, mark the halfway point - at 5½", then another point 5/8" away. (note: if your rigilene/plastic strapping is wider than 1/2" you MUST leave a larger gap...add approximately 1/8" to the width of whatever you are using).
When you're done there will be a small unsewn gap in the seam.
Press the seam open and then fold the fabric tube in half WRONG SIDES TO THE INSIDE.
The gap for the casing should be facing you.
Each of those raw edges need to be hemmed with a 1/4" turn up seam.To sew the casing, mark a line 5/8" away from the fold, sew all around and you have the finished casing.
Then thread the rigilene/plastic strapping through the gap and push the tails inside behind one another. The fabric tube will keep the round shape nicely. (It's just occurred to me that if you want a firmer top, just cut a much longer length and feed around twice).
*handsewing alert! Sew the gap together with small whip stitch or ladder stitch...don't groan it's only 5/8" long!
The rest of the tutorial is pretty much the same technique that the original Red Hen Fabric's tutorial.
Making the base:
Take one of your fabric circles, one of the cardboard circles and the batting piece. Layer as shown in the photo, then gather the fabric up like you are making a large yo-yo. Pull up firmly and tie off.
Do the same for the second circle - only there will be NO BATTING layer
*handsewing alert! Then whipstitch your two circles together.*handsewing alert! Now you need to sew the base to one end of the fabric tube.
Move the inner layer out of the way and stitch the finished base - batting side out, to the hemmed edge. There is a little bit of give in the fabric tube, so just ease onto the base as neatly as you can.
That is the first side done.
In the photo below you will see the sewn base on the left and the loose end on the right.
Push the base all the way through, past the rigilene rim, to meet up with the unsewn fabric on the right.
The picture below shows what you will end up with, it's just photographed from the other side.
As long as you've pushed the base through and can see where you need to attach the lining you are doing the right thing. Pushing it through creates the "lip" of the bin too. The batting side will be inside the bin and the flat base with no batting will be on the outside so it will stand up flat.
*handsewing alert! More hand sewing, but you're only a circle away from finishing!
Sew the flat base to the other hemmed edge.
Now you see it...
Now you don't!
I hope you have fun making lots of them!
I encourage you to go and look at the Red Hen Fabrics tutorial page too.
If you have any problems with any part of the tutorial just email or leave a comment.
thanks for taking a peek over the fence...


