Well hello 2014...where did you come from? Sneaking up on me like that...you should be ashamed of yourself! You're here to stay you say? Ok I'll have to make the best of it then!
I did say that my next post would be about making mini-bunting, and even if it has taken 3 months, here it is!
Just to recap, the bunting postcard was made for the Great Big Stitched Postcard Swap #6 . It made it into the round-up post, which was a bit of a buzz!
So, if you've ever felt like making minuscule bunting you've come to the right place...
(I didn't realise how bad these photos were but if I wait to take them again in better light this tutorial might get posted sometime in 2014! ha ha ha guess what? It does get posted in 2014 and the pics didn't get retaken!)
Then take the other folders corner and bring it up to lap over to the right hand side - you've basically folded the rectangle into 3. Make sure you have a nice sharp point at the bottom.
Don't separate them, leave them in one long line.
Then fold them in half down the length, iron well...starch is your friend with this mini stuff...open out the fold, and then fold each long side into the centre and iron well again (see picture below), just like you are making binding, which of course is exactly what you are doing!
Start inserting the first little triangle and clip in place. See how they are all chained together - you just shove and peg, shove and peg, till you get the arrangement you want.
I made two strips as they fitted the layout of the 6" x 4" postcard.
The binding hides the stitches and keeps those pesky tails that may not quite get sewn, hidden away too!
Snip off the tips of the prominent pointy bits if they didn't fit neatly, but be careful not to cut your stitches.
I sewed slowly over each piece and it fed through the machine fine.
I tried my zipper foot but the results were pretty ordinary, so I went back to the general sewing foot. I also lengthened the stitches which gave a nice effect
And here's the finished product again:
I did say that my next post would be about making mini-bunting, and even if it has taken 3 months, here it is!
Just to recap, the bunting postcard was made for the Great Big Stitched Postcard Swap #6 . It made it into the round-up post, which was a bit of a buzz!
So, if you've ever felt like making minuscule bunting you've come to the right place...
Gather your supplies:
- scraps of fabric - smallest size is 1 1/4" squares.. I had quite a few 2 1/2" squares that I cut in half and then used one of the halves to make two small squares, keep the other 1 1/4" x 2 1/2" rectangle for the bunting "string".
- quilters awl or unpicker or even a small skewer ( helps with holding and folding)
- tweezers (ditto )
- usual sewing supplies, sewing machine etc...(you're not silly I shouldn't have to point out the obvious!)
Cut 1 1/4" squares from your scraps.
If you are using 2 1/2" squares, cut them in half, and make two small squares and one rectangle.
Here's my finished pile of 1 1/2" squares and the leftover rectangles...make mine rainbow thanks!
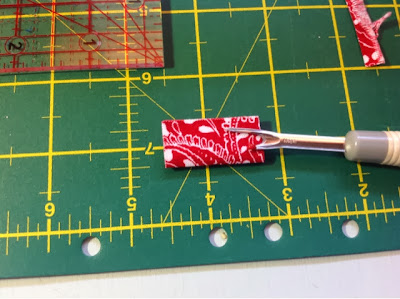
Take one square and fold it in half to form a rectangle:
Fold the bottom right hand corner of the folded edge up to about 1/3 in from the left hand edge
Turn it over - tweezers are a big help here- so the "pointy" bits and fold are at the back.
As you fold each one, feed them through the machine with the aid of your unpicker/awl/skewer.
Don't separate them, leave them in one long line.
Hard to tire of looking at all that cuteness!
Now you've done the bunting, sew those rectangles together into one long strip, open out the seams and iron them flat.
Start inserting the first little triangle and clip in place. See how they are all chained together - you just shove and peg, shove and peg, till you get the arrangement you want.
I made two strips as they fitted the layout of the 6" x 4" postcard.
The binding hides the stitches and keeps those pesky tails that may not quite get sewn, hidden away too!
Snip off the tips of the prominent pointy bits if they didn't fit neatly, but be careful not to cut your stitches.
I tried my zipper foot but the results were pretty ordinary, so I went back to the general sewing foot. I also lengthened the stitches which gave a nice effect
And here's the finished product again:
I hope you have fun making mini bunting...now wasn't that worth the wait?
Thanks for taking a peek over the fence...


How cute! I'm not sure I have the patience to make these tiny triangle pieces but they sure are pretty!
ReplyDeleteSimple but so fiddly. I will have to wait until I have stored up a lot of patience to have a go at these. Happy New Year Hilary. xxx
ReplyDeleteThat is so darn cute! Thanks for sharing :)
ReplyDeleteIt's so cute! My sister will give birth next month and that will be a perfect gift for welcoming her new baby girl!
ReplyDelete